Take & make kits
Crafts are a great way to practice motor skills, experiment with STEAM, and learn about different seasons and holidays! Take & make kits contain supplies and instructions. Each month we’ll have new kits available.
Kits are designed for preschool-aged children, but they are available to children of all ages.
Want to hear about the latest kits? New kits are announced in our e-news.
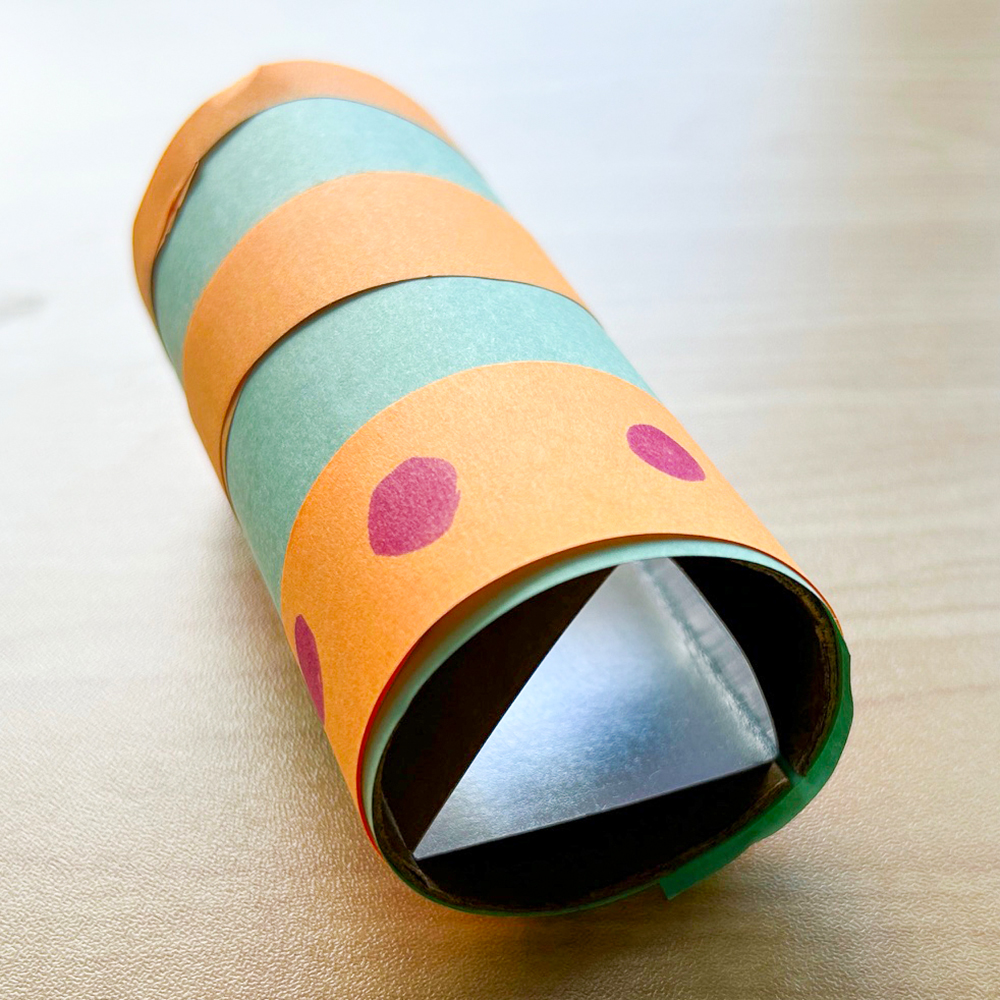
Make a kaleidoscope!
Enjoy pretty patterns and reflections with this month’s take & make craft kit for little ones.
Past projects
Make a lantern for Mid-Autumn Festival
With your own supplies
Materials you'll need
- 4 paper plates
- 1 battery operated tea light
- 2 pieces of letter sized yellow paper
- 4 pieces of ribbon, about 24”
- 1 chopstick
- 2 pieces yellow tissue paper, about 6” x 6”
- 1 piece blue tissue paper, about 12” x 12”
- 1 piece purple tissue paper, about 12” x 12”
- Glue
- Tape
- Scissors
- Pencil or pen
- Optional: stapler
- Maybe adult supervision!
Instructions
- Cut the middle circle out of each paper plate. Discard the circles and keep the rings.
- Cut the blue and purple tissue paper into long rectangles.
- Wrap one paper plate ring with blue tissue paper, and glue or tape in place. The ring will face the lantern, curving away from you.
- Repeat step 3 with a second paper plate ring and purple tissue paper.
- Using one piece of yellow paper, draw and cut out small stars. Glue or tape these to the outside of the blue and purple rings.
- Cut the second piece of yellow paper in half vertically.
- With each new piece of yellow paper, fold about ½ inch of each long edge towards the middle. Then, make small cuts along these edges towards the fold, creating a fringe. Space the cuts about ¼ inch apart.
- Place a plain paper plate ring facing up (curving towards you) on a flat surface. Take a piece of yellow paper, and staple or glue the fringe around the empty middle circle, with the fringe facing towards the middle circle. Stapling is the most secure, and glue will also work, but tape will not secure the paper correctly.
- Repeat step 8 with the remaining piece of yellow paper. Overlap the pieces of yellow paper by about 1 inch.
- Staple or glue the final paper plate ring to the opposite side of the yellow paper. Wrap the fringe around the empty middle circle, with the paper plate ring facing (curving towards) the yellow paper. These are now your lantern’s centre rings.
- Glue or tape one piece of yellow tissue paper over the middle circle of a centre ring. Repeat with the second centre ring.
- Glue or tape the blue ring to the outside of a centre ring. Glue or tape the purple ring to the outside of the opposite centre ring.
- Tape each ribbon to the inside of the lantern, framing the opening in the yellow paper.
- Tie all four ribbons into a knot around the chopstick. Turn the tea light on, and place inside the lantern.
Celebrate Mid-Autumn Festival
Mid-Autumn Festival, also known as the Moon Festival, is a special tradition that has been celebrated by the Chinese community for more than 3,000 years. The festival is on the 15th day of the 8th month of the Lunar Calendar, which is the day of the harvest moon. This year, the festival is on Saturday, September 10. The roundness of the moon symbolizes harmony, peace and togetherness; people come together to thank the moon and celebrate these virtues. During Mid-Autumn Festival, families gather to enjoy the full moon while having a nice family dinner. They also share sweet mooncakes and fruits with friends and relatives under the moonlight. Children spend the night making paper lanterns with their peers. Other Asian countries, such as Japan, Korea and Vietnam, also celebrate Mid-Autumn Festival in their own way!
Learn more about the origin of this special celebration on CBC Kids. Watch the YouTube video Mid-Autumn Festival story and how Chinese celebrate it

Make a paper roll drag doll
With your own supplies
Materials you need
- 1 paper roll
- Googly eyes
- Pipe cleaners
- Ribbons, streamer paper, markers, sequins and other decorations
- Glue, tape or a hot glue gun
- Scissors
- Maybe adult supervision!
Instructions
- Exactly how you dress and design your drag doll is up to you! Take inspiration from a drag queen like Conni Smudge, or create your own!
Make an egg carton jellyfish
With your own supplies
Materials you need
- 2 egg cups cut from a cardboard carton
- 1 piece of cellophane or tissue paper (we used blue) about 4" x 4"
- Paper streamer, or tissue paper (we used blue), cut into 8 strips about 0.5" x 6"
- 2 googly eyes, or a coloured marker
- 1 piece of thread about 6”
- Scissors
- Glue or tape
- Maybe adult supervision!
Instructions
- Glue or tape each strip of paper streamer or tissue paper to the top of one egg cup, working in a circle.
- Using a pen, pencil, or your scissors, puncture a small hole into the top of the other egg cup. Get an adult’s help with this!
- Fold the square piece of cellophane or tissue paper in half in either direction, and cut a small slit in the middle of the fold (about 1 cm.).
- Unfold the cellophane, and place over top of the punctured egg cup, lining the slit up with the hole. Carefully fold the cellophane underneath the egg cup, and glue or tape in place
- Make a loop with the thread and tie a knot. Push the loop through the hole of the cellophane covered egg cup. Start from the bottom, so the knot is on the inside of the egg cup.
- Glue googly eyes, or draw eyes with a marker, on the front of the cellophane covered egg cup.
- Put glue or tape on top of the egg cup with streamers. Push the cellophane covered egg cup on top of this one, attaching it in place.
Make a clothespin butterfly
With your own supplies
Materials you need
- 1 clothespin
- 1 pipe cleaner
- 2 pieces of tissue paper, each about 4”x6”
- 2 googly eyes or a black marker
- Glue or tape
- Pencil, pen or straw
- Scissors
- Maybe adult supervision!
Instructions
- Cut two sides of each piece of tissue paper into the shape of a top of a heart (two half circles side by side).
- With the cut sides facing out to your left and right, fold each piece of tissue paper zigzag style upwards into a thin rectangle.
- Place one piece of tissue paper on top of the other. Place the two pieces inside the clothespin, then gently spread the tissue paper out to create your butterfly’s wings.
- Wrap the pipe cleaner around your pencil, pen or straw. Don’t wrap it too tightly! It should look like the stripe on a candy cane.
- Slide the pipe cleaner off, and curve it into a “U” shape.
- Place the pipe cleaner inside the clothespin, near the top, to create your butterfly’s antennae.
- Glue or tape the googly eyes to the front of your clothespin. If you don’t have googly eyes, draw two eyes with your black marker.
All about butterflies!
Here’s a riddle: what starts their life as an egg, walks on many different legs, and uses wings to fly around? A butterfly!
Butterflies go through an amazing transformation called metamorphosis. This is when a caterpillar creates a cocoon, which is also called a chrysalis or a pupa, which they live in as they transform into butterfly. Some butterflies only spend a few days in their chrysalis, but others can spend over a year transforming!
Learn more about butterflies in this video from SciShow Kids: bit.ly/SciShowButterfly
Make a moon sun catcher
With your own supplies

Ramadan is among the most important months for Islam. Ramadan isn't at the same time every year. It is celebrated in the ninth month of the Islamic calendar. It begins on the first sighting of the new crescent moon. Find out why it is so meaningful to millions of Muslims around the world!
Materials you need
- 2 pieces of contact paper, each about 9X12''
- 2-3 pieces of black construction paper
- Tissue paper in shades of blue, yellow orange and gold
- Glue or tape
- Scissors or X-Acto knife
- Maybe adult supervision!
Instructions
- With the black construction paper, trace and cut out the following shapes. It can be tricky to cut outlines with scissors — an adult can try using an X-Acto knife!
- 1 large rectangle outline, about 9” x 12”
- 1 crescent moon outline, about 6” x 4”
- 1 star outline, about 3” x 3”
- Peel the liner off one piece of contact paper, and place on a flat surface facing up. Stick the rectangle outline to it. Now the inside of the rectangle is a sticky surface!
- Place the crescent moon and star onto the sticky contact paper.
- Cut the tissue paper into various small shapes and sizes. These can be messy! Using different shapes and sizes makes your sun catcher look more like a traditional stained glass mosaic.
- Place the tissue paper onto the sticky contact paper. Use yellow, orange, and gold for the moon and star. Use the different shades of blue and purple for the sky. Try to place different colours and shapes beside each other, and try to totally fill the space. Cut the tissue paper pieces more as you work to fit into the new shapes you create.
- Next seal the back of your sun catcher with the separate piece of contact paper. Peel the liner off and discard, then smooth the contact paper over the entire surface. This step is tricky! Get an adult to help.
- Trim any extra contact paper hanging over the edge.
- Tape your sun catcher to a window and enjoy! Try looking at it during different times & weather, to see how it looks in different light
Make a paper plate unicorn
With your own supplies

Explore emotions (and rainbows!) with a paper plate unicorn Take & Make kit! This craft is inspired by Aurélie Chien Chow Chine's "Little Unicorn Is..." picture book series.
Materials you need
- Paper plate
- Construction paper in various colours, white paper, markers
- Marker, pen or pencil
- Scissors
- Glue or tape
- Optional — small stickers shaped like hearts or stars
Instructions
- Draw and cut out these shapes in your choice of coloured paper:
- 2 ears (we used plain white paper, and made our ears about 2x5'')
- 2–4 hearts (we used blue paper, and made each about 3x3")
- 1 horn (we used yellow paper and made ours about 2x7")
- 10–14 rectangles (we made 14 in rainbow colours, each about 1x5")
- Glue or tape your ears to the back of the paper plate.
- Glue or tape the rectangles to the back of the paper plate along one side to make the unicorn's mane.
- Glue or tape the horn to the front of the paper plate.
- Draw two eyes on the front of the paper plate.
- Optional: use stickers or markers to decorate your unicorn's horn and ears.
- Draw mouths on each of your hearts. We drew a smiley mouth, a sad mouth and an unsure mouth.
- Try placing the different hearts on your unicorn to make them have a different emotion. You can glue or tape one of the hearts to your unicorn's face or keep them all loose to play with.
Learning about emotions
This craft was inspired by Aurélie Chien Chow Chine's picture book series "Little Unicorn Is..." that features a unicorn experiencing different emotions. Teaching our little ones about different emotions — even ones that aren't fun to have — can help them develop self-awareness and help them communicate their needs. Talking about how we feel is an important skill to model to our children and a part of building healthy relationships!